MSVirtual PC 2007 Installation Guide
A Virtual PC environment on Windows 7 can be confusing. I wrote this guide to make it easier.
DOWNLOAD THIS→→ PDF DOWNLOAD ← ←DOWNLOAD THIS

DOWNLOAD THIS→→ PDF DOWNLOAD ← ←DOWNLOAD THIS
VIDEO: youtu.be/f7kHb0MEvsg
… The video was really helpful, but it is unavailable because my account was terminated
*** MICROSOFT VIRTUAL PC 2007 INSTALLATION GUIDE ***
Introduction:
What is MVPC? (Microsoft Virtual PC)
- a virtual PC environment [host/ guest OS i.e. more than 1 O/S]
Why use it?
- Installing old software (transferring data and software compatibility)
e.g. Retro kicks with old software and playing retro games
- Installing new software (testing before applying to host OS)
- Running servers, or adding workstations.
e.g. having 2 IP’s, running Unreal, Minecraft, a website and other servers
INSTRUCTIONS for Microsoft Virtual PC 2007:
- Enable Intel/ AMD Virtualization Technology
- Enable Virtualization in your Motherboard “BIOS”
- Save & Exit
- Reboot PC
- DOWNLOAD all required files
- Extarct required content and rename to avoid installation issues
(See Fixes if errors occur)
Files Required:
- – Virtual PC 2004 SP1; (to get the extracted content)
- + DOS Virtual Machine Additions [Virtual machine floppy]
- + NT4 Network Driver [Virtual machine floppy]
- – Virtual PC 2007
- – Virtual PC 2007 SP1 Update
- + KB958162 [HOTFIX]
- + VPC2007x64-KB969856 [Security Update Patch for SP1]
BEFORE INSTALLATION:
Renaming the files before installation removes compatibility issues when installing on Win7, Win8/8.1, Win10. This also allows for “Windows Virtual PC” to be installed alongside “MS Virtual PC 2007”.
- Rename the VPC 2007 setup file, do not install yet!
E.g; Setup = VPCsetupx64
- Rename the VPC 2007 SP1 setup file, do not install yet!
E.g; Setup = VPCSP1setupx64
- Extract the contents of the VPC 2004 installation file, do not install yet!
- DOS Virtual Machine Additions and NT4 NETWORK DRIVER
… USE these files to run DOS on Virtual PC 2007
Notes:
– Network and DOS VM Additions are not included with Virtual PC 2007
…These files are optional
– VPC2007 VMAdditions are not completely compatible with Win 3.1/ Win95/ Win98
… so the 2004 versions are recommended for those
PRE-INSTALLATION:
- Extract VM Additions from VPC 2004 SP1
- Download all required virtual pc 2004 and 2007 files
- and extract VM Additions using this CMD
msiexec /a “C:\Users\YOURUSERNAME\Desktop\VPC2004\Microsoft Virtual PC 2004 MSDN.msi”
– Please replace “YOURUSERNAME” with your PC name.
How to EXTRACT VPC 2004 FILES:
- download “Virtual PC 2004” installer
- unzip it
- run the following command:
- [start > RUN > CMD >] msiexec /a “Microsoft Virtual PC 2004 MSDN.msi”
- Choose dir and save
- Virtual Machine Additions will be in the dir you saved to, inside this folder;
“\Program Files\Microsoft Virtual PC\Virtual Machine Additions\VMAdditions.iso”
INSTALLATION:


Install VPC 2007 in this order;
- VPC 2007 (rename setup.exe first)
- VPC 2007 SP1 Update (rename setup.exe first)
- VPC 2007 SP1 “Security update PATCH”
- RE-BOOT PC (if asked or encountering issues)
- VPC 2007 SP1 “HOTFIX” (KB958162.msp)
… This enables higher resolutions and other fixes
- To install the “HOTFIX” PLACE THE HOT FIX FILE “KB958162.msp” on the C:\ Drive “C:\KB958162.msp”
Run this CMD prompt as admin;
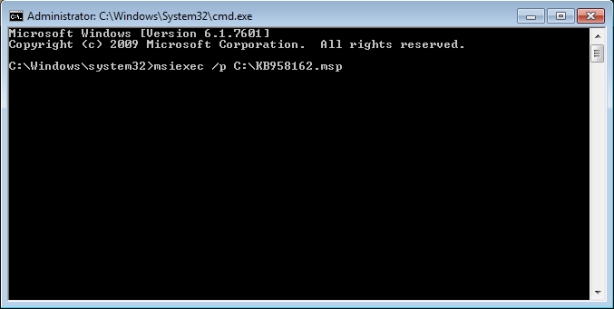
- start > RUN > CMD >
msiexec /p C:\KB958162.msp
- RE-BOOT PC
SETUP:
RUN VPC 2007
- Setup new VHD and install OS
- Install Operating System of choice
- MS-Dos, Win3.1, Win95, Win98, Win2000, WinME
- After operating system is installed and stable AND configured
Additions:
- INSTALL VPC2004 VM ADDITIONS
….This is performed within the Guest OS, to do this boot up the VPC and then;
- Mount VMAdditions ISO and install and Run the install program and Re-boot when asked
- Mount Virtual Disk Precompactor ISO and install [OPTIONAL]
….Virtual Disk Precompactor is not usually required until after finishing with the OS
…See “VMAdditions.txt” for full guide
Links:
It is recommended that all files are obtained from Microsoft’s official servers/ downloads.
VPC2004:
http://www.microsoft.com/downloads/details.aspx?familyid=6d58729d-dfa8-40bf-afaf-20bcb7f01cd1
HOTFIX:
http://go.microsoft.com/fwlink/?LinkId=81489
VMNetwork Driver:
http://go.microsoft.com/fwlink/?linkid=46859
VPC2004 files for use with VPC 2007:
Info:
Hyper-V:
http://blogs.technet.com/b/schadinio/archive/2010/07/09/installing-hyper-v-manager-on-windows-7.aspx
http://www.howtogeek.com/196158/how-to-create-and-run-virtual-machines-with-hyper-v/
CONTINUE READING FOR NOTES, ISSUES AND FIXES AND ALTERNATIVE METHODS
Notes 1 (General):
* a Dynamically expanding VHD is Recommended
– unless you know exactly the space required
– It is not recommended to install Windows XP 64bit in a Virtual PC 2007 environment for several reasons;
- WinXP is more powerful than VPC 2007 can emulate (32bit OS only) and there are better solutions…
- winXP should be installed as a normal operating system on a PC, as a Dual or Triple Boot solution, not virtual.
- Win7 provides enough backwards compatiblitlity to ensure WinXP software works on win7
- Windows Virtual PC 2009 comes packaged with Windows XPMode and also includes a free genuine copy of WindowsXP (x86// 32bit)
– Windows Virtual PC 2009 can also be installed without Windows XPMode
– Windows Virtual PC 2009 is regarded as a Windows update called;
“Windows6.1-KB958559-x64-RefreshPkg”
“Windows6.1-KB958559-x86-RefreshPkg”
NOTES 2 (OTHER OS):
* Win10, Win7, WinXP work as Triple Boot
* MS-Dos and Win3.1 virtual environments are best suited to “DosBox”
* Win95, Win98, WinNT, Win2000, WinME all run in Virtual PC but without GPU emulation
* Installing Windows NT in Virtual PC FIRST allows an easy setup for Triple Boot;
e.g WinNT,Win95/Win98 using 1 virtual machine.
– Multi-boot (3+) is also possible (all windows on 1 virtual PC Harddrive), but not recommended
* 250GB of free space will fit every Pre-7 Windows Operating System
…all can be booted from 1 hard drive using triple boot and virtual PC with multi-boot
… This is an ideal way to backup a clean install of every operating, but you will not be able to use System reserved partitions unless correctly partitioned
* Seperate patitions (for each OS) will have to be created before installation so that boot files get installed in the same place as the OS. i.e. 1 partition per OS/boot
* Virtual Hard Drives can be Booted the same as regular internal harddrives, they can be attached using Right Click MY PC > computer management > attach VHD
Notes 3: (VHD types)
Dynamically expanding (Recommended)
This option creates a virtual hard disk image file that dynamically expands in 2-megabyte (MB) increments to the maximum size that you specify, or until it reaches the available hard disk space on the physical computer.
Fixed size
This option creates a virtual hard disk image file of the actual size that you specify. For example, if you create a 10 gigabyte (GB) fixed-size virtual hard disk image, the created file is 10 GB, even if you do not load any data on the virtual hard disk. Because some versions of Linux use all the available hard disk space in a dynamically-expanding disk image file, it is a good idea to create a fixed-size disk image when you install Linux as a guest operating system.
Differencing
This option creates a virtual hard disk image file that is linked to a second parent virtual hard disk image. This new image contains only data or files that are changed from data or files that are on the parent virtual hard disk image. You must create the parent virtual hard disk image file before you create the differencing virtual hard disk image file.
Linked to a hard disk (Advanced) This option creates a hard disk image file that is linked to a physical hard disk on the host computer. For additional information about this image type, see Virtual PC Help.
More powerful emulator solutions
These offer GPU emulation and other direct advantages with the HOST PC
- – VMWare
- – NVIDIA’s VMWare
- – NVIDIA’s new VMware called the “GRID” system
ISSUES & FIXES
Pre-installation:
- You cannot upgrade Virtual PC 2004 …first remove Virtual PC 2004
- You can upgrade virtual PC 2004 SP1
Enable virtual PC :
- start
- type:
gpedit.msc
administrative teplates
windows components
application compatiblity
- turn off application compatiiblity engine
- edit “enabled”
- turn off program copamtiiblity assistant
- edit “enabled”
- RE-BOOT
- RENAME SETUP TO e.g. “SETUP2.EXE”
- Once installed revert the changes
- Start
- Run
- type regedit
- Navigate here;
- HKEY_LOCAL_MACHINE\SYSTEM\CURRENT CONTROL SET\SERVICES\MSIserver\WOW64
- Right click on WOW64
- select Modify
- Set Value Data to 0 (mine was set at 1)
- Base should be Hexadecimal
- Close everything & reboot
Alternative:
Try: Windows Installer Clean-up Utility
Other methods:
Method 1:
Start the Windows Installer service
- Click Start, type Services.msc and press {ENTER}
- Double-click Windows Installer
- Set the Startup type of Windows Installer to Manual
- Click Start to start the service. Note down the error message if any.
- Click OK.
Method 2: Unregister and re-register the Windows Installer
- Click Start, click Run, type MSIEXEC /UNREGISTER, and then click OK. Even if you
do this correctly, it may look like nothing occurs.
- Click Start, click Run, type MSIEXEC /REGSERVER, and then click OK. Even if you
do this correctly, it may look like nothing occurs, or you may briefly see an hourglass.
After you run this command, the operation is complete.
- Try your Windows Installer-based application again.
Method 3: SFC scan
- Start
- All Programs
- Accessories
- right-click Command Prompt
- Run as administrator.
- Type sfc /scannow
If you are prompted for an administrator password or for a confirmation, type the password, or click Allow
[The sfc /scannow command scans all protected system files and replaces incorrect versions with correct Microsoft versions.]
If any files require a replace SFC will replace them.
You may be asked to insert your Win7 DVD
“Windows resource protection did not find any integrity violations”
— END —

You must be logged in to post a comment.